
It’s spring, which means it’s time for cleaning, a tradition that began thousands of years ago in the Middle East or China. Today, many people skip this annual rite because it can feel overwhelming. But as the world starts to turn green outside, it’s immensely satisfying to tackle long-neglected cleaning, organizing, and decluttering projects. However, if you’re still cleaning with products plastered in warning stickers, it may be time to go green inside as well.
Conventional cleaners help make things shine, but they can be hazardous. Common ingredients in household cleaners, such as perchloroethylene, triclosan, ammonia, sodium hydroxide, and chloride, have been linked to serious illnesses, including asthma, cancer, reproductive disorders, hormone disruption, and neurotoxicity. Furthermore, after we flush household cleaners down the drain, some of them go on to pollute waterways and threaten aquatic life.
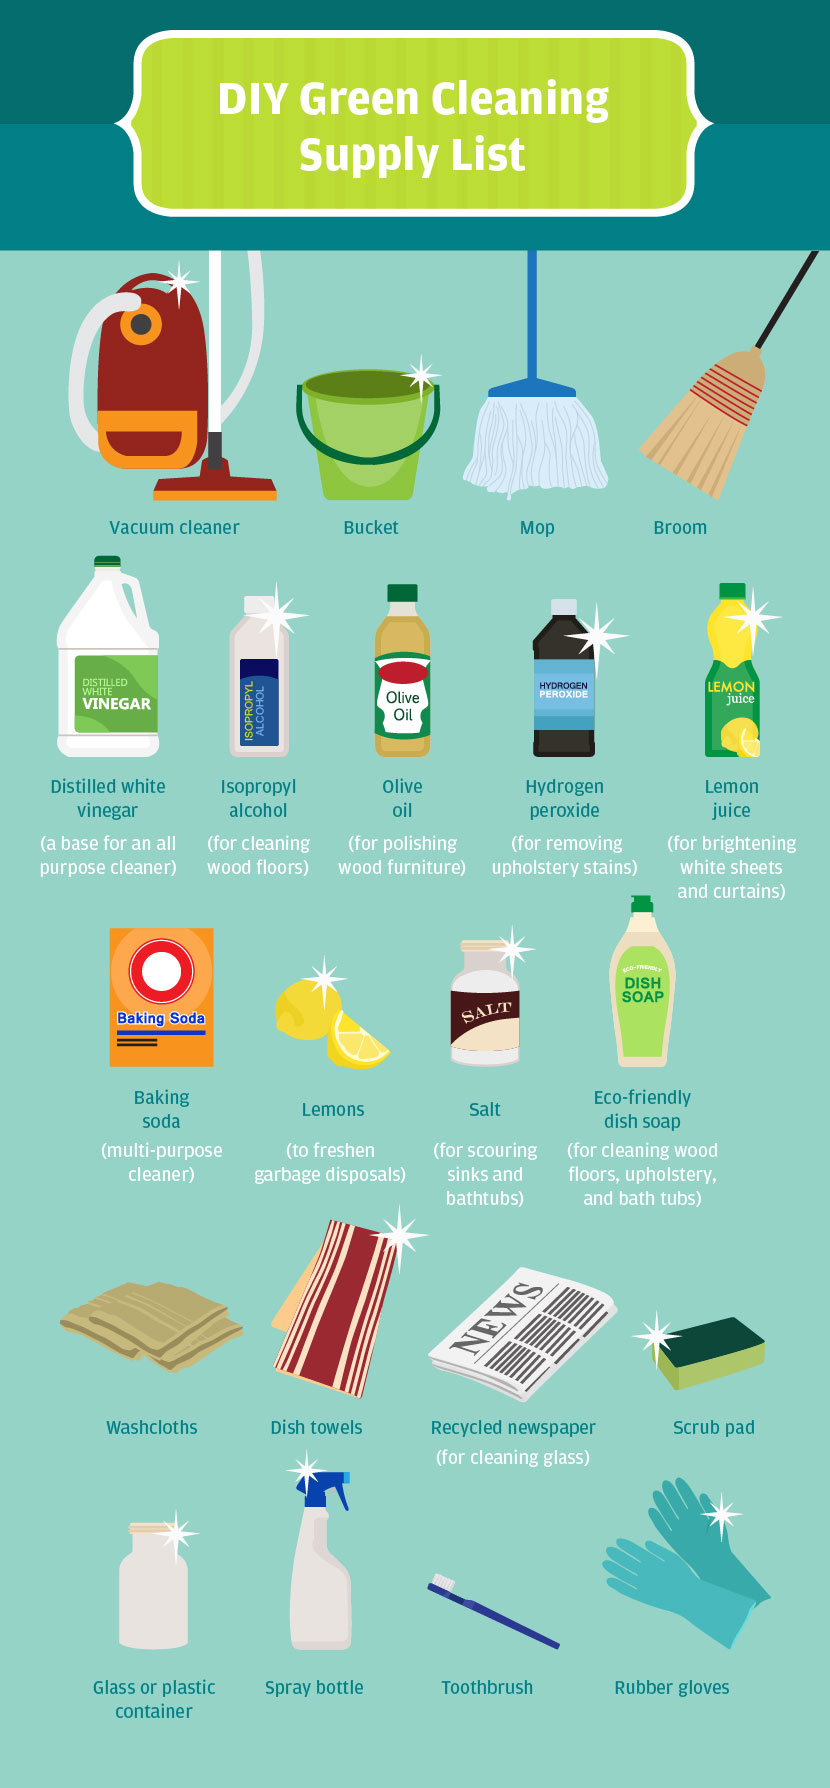
Green cleaning doesn’t mean you have to sacrifice scrubbing power. In this blog series, we’re going to show you how to make every room in your house sparkle the green way.

Get Ready for a Spring Clean
Spend some time brainstorming and planning before you start scrubbing and organizing.
Gather the necessary tools and supplies.
Decide which rooms and projects are a priority and in which order you’ll clean them. Most time-management experts recommend doing the hardest projects first, so doing the rest of the work feels easier. Plan to clean rooms top to bottom since you’ll dislodge dust as you go.
Set your time frame. Aim to tackle a spring clean in several weekends, or break it into smaller tasks over a longer period of time. Be sure to set aside adequate time for priority projects and plan for breaks.
If you have a lot of decluttering to do, consider renting a dumpster or a larger trash can and/or a truck to haul things to recycle and disposal centers.
If your house is carpeted, consider renting a steam carpet cleaner.
Have a family? Get them involved! With a little preparation, spring cleaning can be fun for kids. Use these strategies:
Play some music or audiobooks that set an upbeat tone.
Think of age-appropriate chores for kids and write them down on a colorful checklist. Draw pictures of tasks for pre-literate kids. Kids won’t need to be nagged constantly, and they’ll have fun checking off projects.
Plan to work in teams instead of sending young kids off to clean a room alone.
Kids tire more quickly than adults, so plan some (non-messy) activities to keep them busy after they’re done with their chores.
Plan a special treat or event, such as a family pizza or movie night, after a day of cleaning.
Make snacks and meals ahead of time.
Call in help if needed. Decluttering, organizing, and cleaning can be emotional and strenuous, especially if you’ve neglected a project for a long time. A friend, family member, or professional can help get the job done.
In today’s post, we’re going to walk you through how to clean your kitchen. We’ve also included this super handy DIY Green Cleaning Supply List infographic.
Kitchen
Declutter
- Discard any outdated food from the refrigerator, pantry, or cupboards. Use stilltasty.com to determine the average shelf lives for foods without expiration dates.
- Toss any herbs or spices that have been around for more than a year or that no longer smell fragrant.
- Sort out old or scratched-up plastic containers that are no longer safe for food storage. Use them to organize non-food items in drawers or cupboards or recycle them.
- Donate countertop appliances, pots, pans, utensils, or cookbooks you haven’t used for a year.
Organize
Is the current kitchen organization working? If not, now’s a great time to move things around. Try these best practices:
- Store similar objects together.
- Put the least-used items on the highest shelves.
- Keep items near the places they’re used. For example, store leftover containers and plastic wrap near the fridge and keep pots and pans near the stove.
- Organize your way to less food waste by hanging a marker and a package of labels on the fridge so you can write a name and date on leftovers. Consider putting an “eat-me-first” tub or cardboard box on the top shelf of the fridge. Store items that are almost expired front and center.
- Use see-through baskets and bins to keep cupboards organized so you know where everything is at a glance.
- If wall space is more plentiful than drawer space, use pegs to hang utensils, pots, pans, oven mitts, or aprons (ideally at least two feet from the stove).
Deep clean
- Oven
Coat the oven with a paste of baking soda and water and let it sit overnight. Put on gloves and use a plastic spatula to remove the paste. Wipe away any remaining residue with a wet cloth.
- Coffee maker
Fill the tank with equal parts water and vinegar. Run it through half a cycle. Stop it, let it sit for an hour, then complete the cycle.
- Drawers and cupboards
Make an all-purpose cleaner by putting equal parts water and vinegar in a spray bottle. Use it to wipe down the bottoms of drawers and cupboards. Then dry and reline drawers and shelves if necessary. Consider eco-friendly, non-adhesive cork drawer liners.
- Refrigerator
Remove all the food and unplug the fridge. Wipe down all the surfaces with a paste of baking soda and water and use a toothbrush to scrub the crevices. Rinse with a wet, clean cloth. Vacuum the condenser coils, which are located on the back of the fridge or beneath the grill in the front.
- Sink
Scour with baking soda and salt.
- Garbage disposal
Cut a lemon in quarters. Turn the water and disposal on and carefully feed the pieces one at a time into the disposal.
Check back soon for the next part of the series— the living room!
